1 Introduction
1.1 Overview
The purpose of MHS is to facilitate the collection of biomass data from outdoor study areas. The system allows biologists to record samples at GPS waypoints. The application allows a group of field biologists to use a portable computer and integrated data sampling hardware to take measurements of plant species. The resultant sample data can be exported for use in other data systems like GIS or statistical packages.
1.2 License Agreement
This software is not yet formally licensed. The University of Alaska Anchorage and Jim Weller reserve all rights.
1.3 System Requirements
1.3.1 Software Requirements
- Microsoft Windows XP SP2 or higher
- Microsoft .NET Runtime 1.1 or higher*
- Polhemus PATRIOT™ Drivers*
- Microsoft Managed DirectX 9.0c*
* These items are bundled on the installation media
1.3.2 Hardware Requirements
- Polhemus Patriot
You will need a Polhemus PATRIOT ™ dual sensor motion tracker (3D radio pen) in order to measure three dimensional coordinates.
- Mitutoyo Calipers (optional)
USB attached Mitutoyo calipers can make measuring small distances much simpler because the measurement and text input are combined into a single action. If you don’t have Mitutoyo Calipers then measurements must be entered as text manually.
- Microsoft Windows XP SP2 compatible computer
The hardware requirements for MHS are the same as the requirements for Windows XP. Additionally, you will need a USB slot for the Polhemus and optionally for the Mitutoyo Calipers.
- Tablet PC (optional)
A touch screen computer running Microsoft XP Tablet Edition can make input much easier because mouse and keyboard are not required, text strings can be input as handwriting and a tablet is easier to hold in the field.
2 Installing MHS
MHS is distributed as a Microsoft Installer (MSI).
- Verify that the Polhemus Drivers and DirectX are installed
- Double click Mhs.msi to begin installation
- Follow the prompts clicking Next after each step
- Click Finish
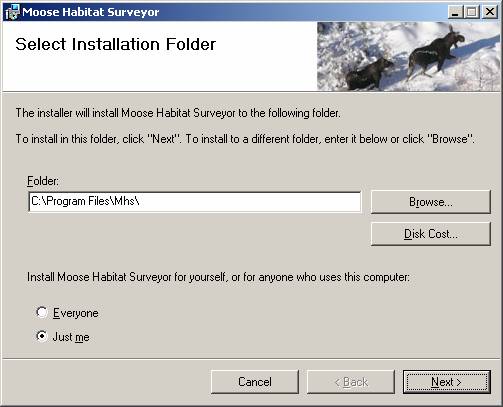
Figure 2‑1 MHS Installer
3 Using MHS
3.1 Starting Mhs
The MHS installer places a shortcut on your start menu under programs and on your desktop. Use these shortcuts to start the MHS program.
![]()
Figure 3‑1 Start Menu Shortcut
3.2 MHS Graphical Interface Layout
3.2.1 Overview
MHS uses a single window graphical user interface to control and view model data.
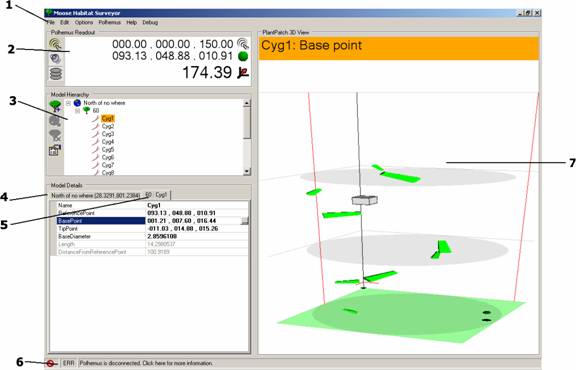
Figure 3‑2 MHS User Interface
- Menu Bar contains menus to manipulate the model and view
- Polhemus Readout gives real time feedback about the position of the Polhemus Patriot and the target random reference point
- Model Hierarchy is a tree view of the entire FieldTrip hierarchy from FieldTrip to Waypoint to PlantPatch to CurrentYearGrowth
- Model Details shows an aerial view of the selected Waypoint on the first tab
- Model Details shows the properties of the selected Waypoint, PlantPatch or CYG on the second tab
- Polhemus Status Bar at the bottom of the screen shows the status of the Polhemus USB connection
- PlantPatch 3D View shows a 3D model of the currently selected PlantPatch and sometimes instructions to guide sampling
3.2.2 Menu Bar
The menu bar gives the user access to a variety of functions. It is mapped below in its entirety.
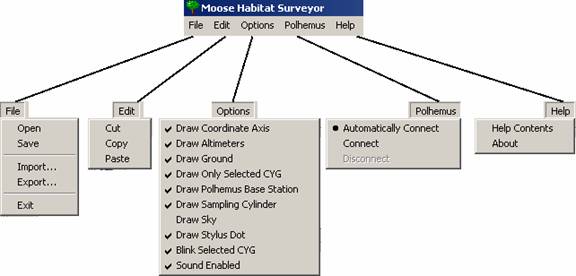
Figure 3‑3 Menu Bar
- File
- Open loads a saved FieldTrip from an XML file
- Save writes a the current FieldTrip to an XML file
- Import… reads Waypoint data from a file
- Export… writes model data to a CSV file
- Exit quits the application
- Edit follows Windows conventions for managing text
- Cut
- Copy
- Paste
- Options
- Draw Coordinate axis toggles axis lines
- Draw Altimiters toggles altimeters on the coordinate planes to help find reference points
- Draw Ground toggles drawing the floor or ground
- Draw Only Selected CYG toggles showing all 9 CYGs or just the one that is selected in the Model Hierarchy
- Draw Polhemus Base Station toggles a gray box that represents the Polhemus base station on a pole 1.5 meters from the ground
- Draw Sampling Cylinder toggles slightly transparent cylinders that shows the sampling container
- Draw Sky toggles a blue background
- Draw Stylus Dot toggles the dot that describes the Polhemus’ position in the PlantPatch scene
- Blink Selected CYG toggles the selected CYG and the its reference point blinking
- Sound Enabled toggles “Geiger counter” feedback when seeking reference points
- Polhemus
- Automatically Connect toggles automatically looking for a Polhemus. Enabling this option allows convenient sleeping of the computer, but can slow down managing data without a Polhemus attached.
- Connect to an attached Polhemus
- Disconnect from an currently attached Polhemus
- Help
- Help Contents displays help file table of contents
- About displays author and version information
3.2.3 Polhemus Readout
The Polhemus readout is in the upper left hand corner of the screen. Polhemus Readout show the position of the stylus relative to the reference point the biologist is trying to pin point. The readout has a button bar to adjust common sampling modes like sound.

Figure 3‑4 Polhemus Readout Interface
- Simulate Stylus Click Button does the same thing as the stylus button it takes the current position of the stylus and feeds it to the sampling wizard. Use this button when the stylus is to far to reach (like at the Z=300 cm mark attached to an extension pole)
- Toggle Audio enables/disables audio feedback. Audio feed back helps determine proximity to the reference point.
- Toggle Bounding Cylinder Visibility draws/hides the bounding cylinders when help determine level and sample bounding size.
- Polhemus Position shows the current 3D position of the stylus relative to the base station. Z=0 is ground. Z=150cm is the Polhemus base station. Z=300 is the top of the sampling cylinder.
- Target Reference Point shows the coordinates random point you are trying to locate
- Distance between Polhemus position and reference point shows the Cartesian distance in centimeters between the previous two items, Polhemus and reference point.
3.2.4 Polhemus Status Bar
The Polhemus Status Bar indicates the current connection status of the Polhemus device. It is updated every few seconds.

Figure 3‑5 Polhemus Status Bar
- Status Icon is either a check on successful connection or a “not” on unsuccessful connection
- Connection Type indicates whether the Polhemus is connected via USB or serial (SER).
- Status Message is an information message about the last interaction with the polhemus device.
3.2.5 Model Hierarchy
The Model Hierarchy shows the complete view of the MHS model with Waypoints containing PlantPatches containing CurrentYearGrowths. There are buttons to manipulate and view details about the model.
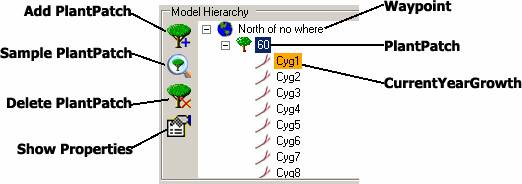
Figure 3‑6 Model Hierarchy
- Add PlantPatch button adds a new default PlantPatch to the selected Waypoint.
- Sample PlantPatch button initiates the sampling wizard for the selected PlantPatch
- Delete PlantPatch button deletes the currently selected PlantPatch
- Show Properties button brings the Properties Grid to the foreground to show the properties for the selected model item
- Waypoints are shown with a globe and are the top level model component of a fieldtrip. Since waypoints are assigned by an agency and imported, they cannot be added or deleted individually
- PlantPatches are shown with a tree and are contained within Waypoints and contain CurrentYearGrowths
- CurrentYearGrowths are shown with a twig and appear under PlantPatches. There is always a fixed number of CYGs and they cannot be added or deleted individually
3.2.6 Waypoint Aerial View
The Model details area combines the Waypoint Aerial view and the Properties Grid in a TabControl. The waypoint aerial view gives an overhead perspective of PlantPatches within a Waypoint and quick stats panels for the selected Waypoint and PlantPatch.
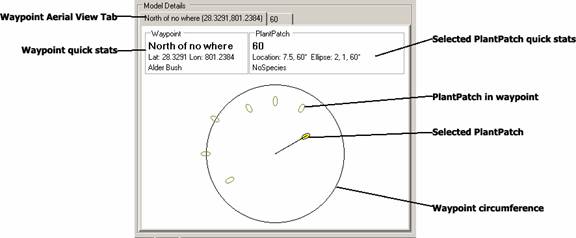
Figure 3‑7 Waypoint Aerial View
- Waypoint Aerial View tab displays the Waypoint aerial view when selected
- Waypoint Quick Stats panel gives the Name, Latitude, Longitude, and Habitat type of the selected Waypoint
- Selected PlantPatch Quick Stats panel gives the Name, Distance, Bearing, Short Axis, Long Axis, Long Axis Bearing, and Species of the selected PlantPatch
- Waypoint Circumference describes the area of the circle with the Waypoint at its center.
- PlantPatches are drawn as green ellipses. The Selected PlantPatch is highlighted yellow and is indicated by a radius line.
3.2.7 Property Grid
The Model details area combines the Waypoint Aerial view and the Properties Grid in a TabControl. The property grid shows details about any Waypoint, PlantPatch or CurrentYearGrowth that is selected in the Model Hierarchy. Values can be edited directly or they can be inked in. Some properties, like PlantPatch species, have pull down menus.
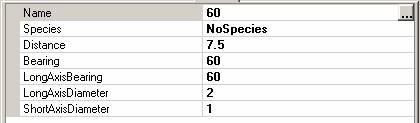
Figure 3‑8 Properties Grid
- Left Column is the Name of the property. The example shows that this PlantPatch has a property named Bearing.
- Right Column is the Value of the property. The value of Bearing is 60.
- Control on the right of the value like the
 button shown in the
example can be used to edit a value. Sometimes this is text/handwriting
input. Sometimes a pull down menu.
button shown in the
example can be used to edit a value. Sometimes this is text/handwriting
input. Sometimes a pull down menu.
3.2.8 Sampling Wizard Instruction Area
When in PlantPatch sampling mode the area above the 3D viewer will turn orange and display instructions to guide you through measuring a PlantPatch.

Figure 3‑9 Sampling Wizard Instructions
3.2.9 PlantPatch 3D View
The PlantPatch 3D View shows the sampling area of the selected PlantPatch. A number of devices are employed to help guide you through this model space like a model Polhemus base station, shadows, and altimeters. You can click to see the scene from different perspectives.
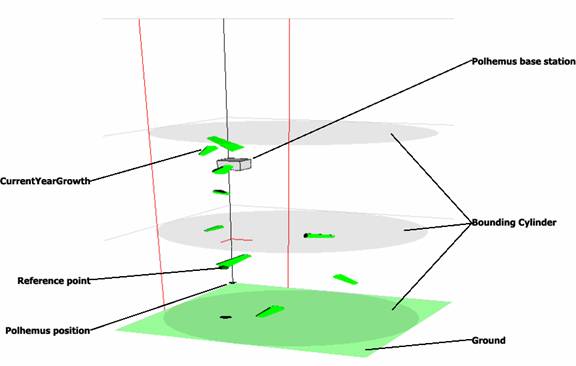
Figure 3‑10 PlantPatch 3D View
- CurrentYearGrowths are shown as green cylinders
- Reference Points for the selected CYG is shown as a red dot
- Polhemus Position is shown as a blue dot
- Polhemus Base Station is shown as the gray
- Bounding Cylinders help indicate depth levels and cylinder boundaries
- Ground is shown as pale green and helps add contrast to shadows
3.3 Importing a list of WaypointsCSV data files containing a FieldTrip’s GPS Waypoints can be imported from a file.
- Click the File menu
- Select Import…
- Locate and select the agencies CSV data file
- Upon successful import, the list of waypoints is shown in the Model Hierarchy area
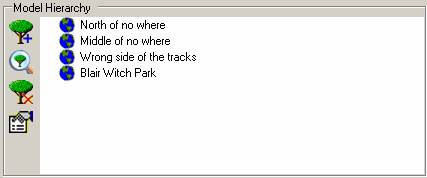
Figure 3‑11 Successfully Imported Agency File
3.4 Managing the Polhemus Connection
The Polhemus Patriot can be managed using the Polhemus menu. Monitor the status of the connection using the status bar at the bottom of the window. By default, the Polhemus is disconnected at application startup and the Autoconnect feature is disabled. You can connect the Polhemus by selecting the Connect menu item. You can detach the Polhemus with the Disconnect menu item. If Autoconnect is selected then the program will continually monitor the status of the Polhemus connection. Autoconnect allows the computer to sleep and for the operator to plug/unplug the Polhemus without having to manually reconnect. Autoconnect can slow done data entry when no stylus is connected.
3.5 Managing PlantPatches
3.5.1 Adding a PlantPatch to a Waypoint
Waypoints start empty of PlantPatches. PlantPatches are
added to Waypoints via the Add Plant Patch toolbar button ![]()
- Select the Waypoint you are currently sampling
- Click the Add PlantPatch button
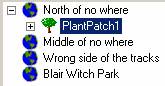
Figure 3‑12 Newly Added PlantPatch
3.5.2 Changing a PlantPatch’s attributes
Use the Properties tab of the Model Hierarchy to adjust the PlantPatch’s species, bearing, diameters, and orientation. Note that the properties tab can be used for Waypoints and CYGs as well as PlantPatches.
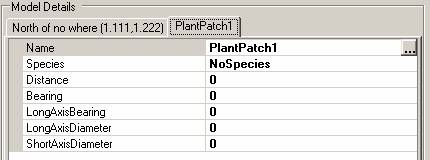
Figure 3‑13 PlantPatch Properties
3.5.3 Deleting a PlantPatch from a Waypoint
Delete a PlantPatch by first selecting it from the Model
Hierarchy and then clicking the Delete PlantPatch button ![]()
WARNING: ONCE YOU HAVE DELETED A PLANT PATCH FROM A WAYPOINT, ALL DATA ABOUT THE PLANTPATCH WILL ALSO BE DELETED. DELETION OF A PLANT PATCH CANNOT BE CANCELED OR REVERSED.
3.5.4 Sampling a PlantPatch’s CYG’s using the Measurement Wizard
The Measurement wizard will walk you through all 27 steps necessary to sample a PlantPatch (9 CYGs times 3 CYG measurements per CYG). Simply follow the instructions and the prompts.
- First select the PlantPatch you’ll sample
- Click the Sample PlantPatch button

- A dialog box will tell you to Begin Sampling.
- Click OK
- The orange area at the top of the PlantPatch 3D view will give you instructions
- The CYG being sampled will turn orange in the Model Hierarchy
- You’ll repeat this sequence 9 times, once for each of 9 random spots
- Find the random point.
i. Use the stylus to find the random point.
ii. If audio feedback is enabled then this will sound like a Geiger counter. Tick-tick-tick. The closer you get the faster the ticking.
iii. The Polhemus readout panel will help you determine your distance from the random point.
iv. The altimeters in the 3D display can help you orient. The blue altimeters are your current position. The green altimeters are your target position.
- Find the closest CYG. Once you are close enough to the random reference point then find the CYG base that is closest to the point. You can use the distance from the Polhemus readout to help determine which of many CYGs is closest.
- Sample Base. Sample the CYG base placing the stylus on the CYG’s base and clicking the stylus button
- Sample Tip. Repeat for the CYG’s tip
- Sample Diameter. Finally, use the calipers (or keyboard) to input the measurement of the CYG’s base diameter.
- After doing all 9 CYG’s a dialog box will tell you to stop sampling. Click Ok.
NOTE: The user interface is unforgiving of errant clicks during sampling. Be careful not to let the mouse or keyboard change the focus from the currently selected property.
NOTE: There is no way to interrupt sampling once it begins. You must finish sampling.

Figure 3‑14 PlantPatch sample wizard instructions in orange

Figure 3‑15 Polhemus Readout relates positions
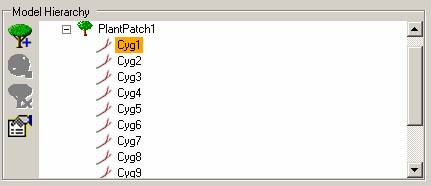
Figure 3‑16 CYG being sampled shown in orange
3.5.4.1 Changing the values of a CurrentYearGrowth
Like PlantPatches, CYG’s values can be changed using the Properties tab of the Model Details. You can either type on the keyboard or click the ‘…’ button to use handwriting tools with a tablet PC.
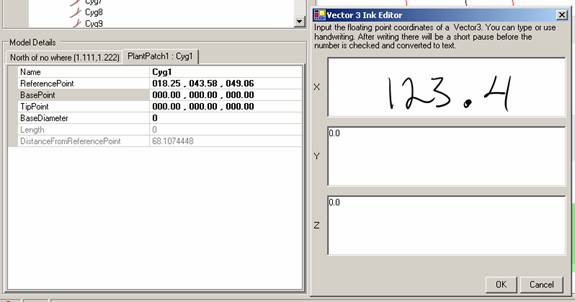
Figure 3‑17 Changing CYG properties with handwriting
3.6 Saving a FieldTrip to file
Saving a Field Trip to a file writes the current state of the MHS program with all the samplings and measurements into an XML file which can be loaded later. This allows you to continue working on a FieldTrip later. Saving is useful if you have to reboot the computer, are out of computer battery, or want to save your work before starting another sampling.
1. Click on File menu
2. Click Save
3. Select a file location and name using the dialog
4. Click OK
3.7 Loading a FieldTrip from file
Saved FieldTrips can be loaded into the application from a save file. This allows you to continue working on a previously saved file.
WARNING: LOADING MHS SAVE FILES WILL RESET THE CURRENT STATE OF THE APPLICATION. ALL CURRENT DATA WILL BE PERMANENTLY LOST! BE SURE TO SAVE YOUR CURRENT SESSION BEFORE LOADING ANOTHER.
- Click the File menu and
- Click Load…
- Specify the file location and name
- click OK
- The interface will refresh to show the loaded data
3.8 Exporting Biomass data to file
The MHS data model can be exported to a comma separated values (CSV) format. This allows agencies and analysts to analyze the collected data in other software suites like ArcGIS, Microsoft Excel or SPSS.
- Click on File menu
- Click Export…
- Use the dialog to select the file location and name
- Click OK
4 File Formats
4.1 Import Format
The import file format that FieldTrip expects from an agency is a plain text file with Waypoint records (instances) separated by line (e.g one per line) and values separated by commas. Literal commas in a value (rather than as a record separator) are escaped with the backslash (‘\’) character (e.g. “a,a\,b\,c”). White space between separator commas is ignored. Lines beginning with # are ignored as comments. Each Waypoint record contains 3 or, optionally, 4 values:
1. latitude – UTM latitude of a Waypoint
2. longitude – UTM longitude of waypoint
3. habitat type – a text string with the agency’s coarse description of the habitat type
4. [name] – optionally, an agency friendly string describing the waypoint
4.2 Export Format
The export format follows the same comma separated conventions as (4.1). It will output 44 or more values per record. The export record can have a list of biologist’s names appended to the end of the record (separated by commas of course). So the record size is variable after the 44thth entry.
1. lattitude – UTM lattitude of Waypoint
2. longitude – UTM longitude of Waypoint
3. habitat type – Agency’s coarse description
4. waypoint name – Waypoint’s textual name (or possibly agency’s friendly name)
5. date stamp – The finish time of the PlantPatch
6. plant patch name – The textual name of the PlantPatch
7. plant patch species – The species of the PlantPatch
8. CurrentYearsGrowth1dist – The CurrentYearsGrowth’s bases’ distance from the random point at that level
9. CurrentYearsGrowth1length – The CurrentYearsGrowth’s length from base to tip
10. CurrentYearsGrowth1diameter – The CurrentYearsGrowth’s base diameter
11. CurrentYearsGrowth1level – The CurrentYearsGrowth’s depth level
12. CurrentYearsGrowth2dist
13. CurrentYearsGrowth2length
14. CurrentYearsGrowth2diameter
15. CurrentYearsGrowth2level
16. CurrentYearsGrowth3dist
17. CurrentYearsGrowth3length
18. CurrentYearsGrowth3diameter
19. CurrentYearsGrowth3level
20. CurrentYearsGrowth4dist
21. CurrentYearsGrowth4length
22. CurrentYearsGrowth4diameter
23. CurrentYearsGrowth4level
24. CurrentYearsGrowth5dist
25. CurrentYearsGrowth5length
26. CurrentYearsGrowth5diameter
27. CurrentYearsGrowth5level
28. CurrentYearsGrowth6dist
29. CurrentYearsGrowth6length
30. CurrentYearsGrowth6diameter
31. CurrentYearsGrowth6level
32. CurrentYearsGrowth7dist
33. CurrentYearsGrowth7length
34. CurrentYearsGrowth7diameter
35. CurrentYearsGrowth7level
36. CurrentYearsGrowth8dist
37. CurrentYearsGrowth8length
38. CurrentYearsGrowth8diameter
39. CurrentYearsGrowth8level
40. CurrentYearsGrowth9dist
41. CurrentYearsGrowth9length
42. CurrentYearsGrowth9diameter
43. CurrentYearsGrowth9level
44. biologists name1
45. [biologists name2]
46. […]
4.3 Save File Format
The save file format will use Microsoft’s native serialize and deserialize methods to save model state in XML. This will be an exact record of the field trip that can be later loaded into the application.
The XML format is also a viable data processing format because it is structured and contains all the necessary metrics to calculate biomass magnitudes. It could be used as an alternative to the CSV export format. It could also be used to do different calculations than those performed during an Export function.
5 Uninstalling MHS
Since MHS uses a Microsoft Installer (MSI). You can use Add/Remove programs to remove MHS. If you have the original installer you can also right click it and select uninstall.
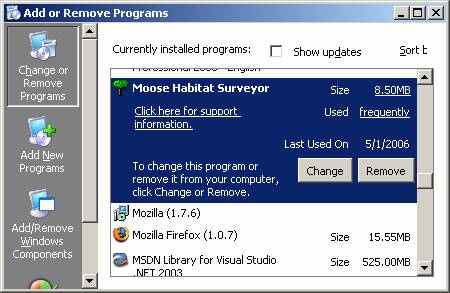
Figure 5‑1MHS in Add/Remove Programs
6 Frequently Asked Questions
6.1.1 When importing or loading a file a message box appears saying that the file cannot be read. Why?
- Make sure you’ve specified file name and path correctly.
- The file you are trying to import / load is possibly damaged. Verify the file contents. See 4 File Formats.
6.1.2 My saved file seems corrupted, is there a way I can use my exported data file in order to recover my loss?
No, there is no way to open an exported agency data file in the MHS application. The export file does not contain the original data. Rather it contains calculated data based off the original model. The MHS export is a text file, your only other option is to manually cut and paste data out of this file into a new MHS application file and save it again. You should always make backups of you saved data. Consult the MHS design document for details.
6.1.3 Why can’t I import what I export?
The import and export specifications differ. An import is just a list of waypoints and habitat types. An export has all the biomass data sampled. Consult the MHS design document for details.
6.1.4 When sampling, sometimes I get “Invalid Property”. Why?
The sampling wizard is trying to combine custom events from the Polhemus with the standard HID input from the Calipers. It’s very sensitive about focus issues. Focus must remain in the appropriate GridItem in the properties grid. If you get out of sequence or perform an errant click, then you must re-focus the correct GridItem. The orange wizard area tells with attribute is being sampled. Select theGridItem corresponding to the orange wizard instruction area.